Light and Edges; Varenna painting progress (W.I.P.)
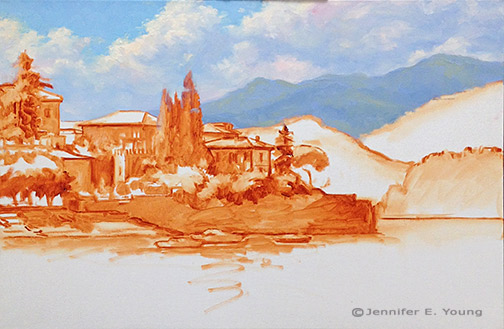
Here is some progress to report on the Varenna painting I've been working on.  In my last post I had pretty well laid out the background. But when I came back to the easel again I decided that before jumping into the foreground I should add a little more contrast to the nearest mountains and soften up some edges to the distance overall.

Painting edges by Jennifer E. Young

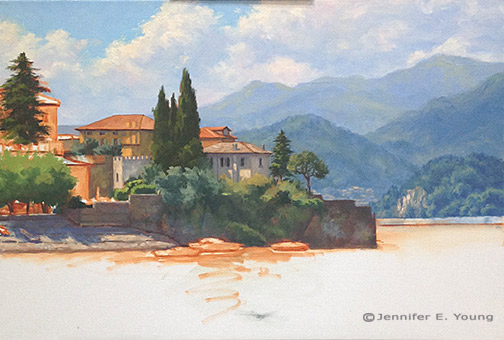
That done, I address the walled village of Varenna next. I want to establish the village before the water, so that when I get to the water I will be able to properly address the reflections. First, I set about laying in the darkest passages.

Lake Como Italy painting in progress by Jennifer E Young

Next I start in on the buildings. The direction of the light is upper left. This was close to 11 a.m., so the sun is high but not directly overhead. Even so, I think with the movement of those clouds and the way the trees and shrubs are positioned, there are some interesting shadows being cast on the buildings. I hint at this in my study, but in the larger composition it took some time and concentration to get it to look right.

Varenna Italian landscape painting by Jennifer Young

Here's where I am this morning with the painting. I'll be working on this today and again Wednesday, so assuming nobody gets sick and we don't get more snow  I will have some more progress to report this week!

Italain landscape painting in progress by Jennifer Young

Varenna's dramatic skies (W.I.P. continued)

When I traveled to Bellagio and Varenna, one of the things that struck me about the landscape was the dramatic cloud formations that settled over these little lake towns. Possibly this is due to the altitude, or the difference in altitude between the lake and the surrounding mountains. OR, it could have just been my timing. In any event, while they were very beautiful and created spectacular displays, they also made it pretty tricky to sketch/paint en plein air because the daggone light kept changing from minute to minute. In the studio, of course all of that is much easier to control, and I get to celebrate the beauty of the clouds without at the same time cursing the inconvenience of them ;-). After I sketch in my composition, my most common approach to landscape painting is to lay in the sky and the far distance. Since the sky contains my light source, the highlighted sides of the clouds will hold some of the lightest values in the painting. Probably the only other things that approach this high value is the light bouncing off of the white painted boats.

Landscape painting of Varenna Italy in progress by Jennifer E Young

I am not sure if it's evident in this photo, but I have used an array of colors (cad orange, cad red light, alizarin permanent, ultramarine and sevres blue) to tint the clouds. The blue sky is a combo of ultramarine, sevres blue, and white.

cloudsdetail.jpg

Next distant mountains progressively deepen in value, but they are still very cool in temperature, so that they will sit back behind what's to come in the foreground. After evaluating my composition further, I decided to raise the distant horizon line, so as to push those cliffs back a bit more, in relation to the foreground town.

 After I get the painting a little further on, I may come back and tweak what I've done here. But for now  it's time to address  the water and the heart of the matter; the town of Varenna.

Varenna Shoreline W.I.P.

I feel a bit like Punxsutawney Phil, poking my head out into the public for a brief moment, only to run back into obscurity and wait out the rest of winter. It's not really fair to blame a pudgy little rodent for my absence and for all of the crazy snow days we've been dealt this winter. But given he's fictional and defenseless and  I've no one else to point a finger at, Phil it is. Nevertheless, I've started a new painting based on the small study I posted in my last entry. This is the tonal lay-in on a 24x36" canvas. Some of the lighter  areas got a little too "tonal" as I made adjustments to the drawing, (most notably the boats) but as I have my study and photos, I will make those corrections when I get into color.

Landscape painting Varenna Italy in progress by Jennifer Young

 There are only slight variations in design at this point-- just a minor reshaping of the distant hills to slow the speed of the downward slope. I also simplified and "skooched" back (sorry for the technical lingo) one building that sat directly behind the villa sitting closest to center to minimize the confusion of these overlapping forms and hopefully  create a more elegant design.

I 'm generally happy with the color plan I used in the study though, so at this point my plan is to follow its lead as I start my next steps of diving into color.

Finally complete- Tuscan Hay painting

I'm taking a break from chopping my vegetables to finally wrap up the latest Tuscany painting I left flapping in the breeze on New Year's Day. After I had my composition established and my canvas covered, it was time to go back in to further develop the background, middle ground, and foreground. It sounds very systematic, but this was really more of a back and forth dance because the value, scale, edges, etc. all have to relate and are interdependent with the other elements in the painting. For instance, in the image below, I thought I had the background fairly finalized...until I took a step back and decided the buildings were too large and too prominent in relation to my foreground house. As I moved forward to the center of interest it became apparent that these two areas of the painting were battling for attention. So I went back and softened the distant village and reduced the size and contrast of the buildings a bit more, and further softened their edges.

Tuscany landscape painting in progress by Jennifer E Young

Here's the final:

"Tuscan Hay" Oil on Linen, 20x24" ©Jennifer E Young

"Tuscan Hay" Oil on Linen, 20x24" ©Jennifer E Young

Progress on the Tuscan Hay painting

As is typical of my working method, I establish my sky and clouds first on my newly sketched canvas. This helps me to key the rest of my light values in the painting. At this point I alsolay in a first pass on the distant mountain.

Tuscany landscape painting in progress by Jennifer E. Young

Next come the hill town and terraced hillside of the background. At this point I am still establishing the compositional elements so there is not much color or value variation. I will go back into these areas again, but I really want to develop the entire canvas to the same level before it sets up too much, as I'm not sure when my next painting session will be.

Tuscany landscape painting in progress by Jennifer E. Young

Now for the middle distance, where my area of interest (the house) resides. I decided to lower the cypress to the right of the house, as I felt there needed to be some height/shape variation in the trees flanking the house.  I'll have to go back into that sky area again where I made this change to clean it up a little more. Good thing I still have plenty of that sky color on my palette! Again, I don't have much in the way of highlights yet...just a few value shifts to give certain objects a little form.

Tuscany landscape painting in progress by Jennifer E. Young

Now I'm ready to start laying in the foreground hill and those groovy hay tracks.

Tuscany landscape painting in progress by Jennifer E. Young

That was fun! Now I have the whole canvas covered more or less to the same level of finish. There's a good deal more to do, but this feels like a pretty good start for around 4 hours of work.