Still life shadow box

I mentioned in my last post that it's helpful to have some control over the lighting environment when painting the still life. A simple solution is to create a shadow box. This is not a new idea. If you google "still life shadow box", you can find lots of examples. I looked at a number of them, but given my tendency for being definitively un-handy when it comes to building things, I went for the low tech option as described by Lee A. Brown on his blog A Day Not Wasted. The only difference was that I didn't bother with the plastic corner moulding he mentions. Instead I found one of my favorite "building" supplies, some duct tape, (in black- SCORE!) when I was shopping for the foam core. Made this way, the box isn't indestructible, but it's sturdy enough since I don't really foresee needing to move it around all that much. The other difference in my box is that I made two windows for the light, one on top and one on the left side, which I can cover or uncover with the leftover scrap foam core, depending on which direction I want the light.  Here's what mine looks like:

Shadow box for still life painting

All of this is sitting on this Ikea kitchen cart on wheels, which I found on Craigslist for $10 (SCORE! again.) I'm only 5'4", so at my height, this cart brings my objects about as close to eye level as I can manage given the space I have to work with. I've gathered various boxes (gift boxes, jewelry boxes, etc. to help elevate my objects even further, and to provide some variety in the height I can achieve with various objects.  Here's a slightly different angle, with my last still life setup inside:
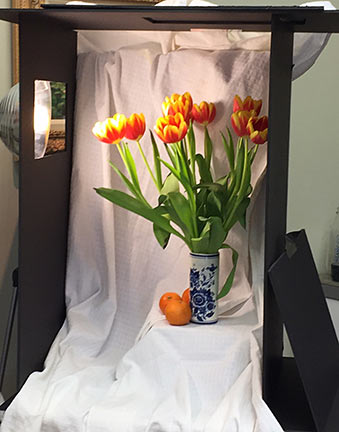
Still life setup

Still life setup

A simple large cardboard box, open on one end, and a shop light from Home Depot, is an even lower-tech version that would also work perfectly fine.

Still life...trying again

The last time I attempted a floral still life painting, it all went south. But, since I have been wanting to build a more regular practice of painting and drawing from life, and since it is nothing but brown and gray outside right now in Virginia (not to mention that I don't tolerate the cold too well) I decided not to let a little past  failure hold me back. And as they say, it's in the failures where we have great opportunity to learn and grow. It sounds a bit cliché but it's also actually true, especially if you don't let the failures wig you out. I have to admit, at first I did duke it out with the old psyche a bit, but upon reflection I realized that I really did learn a few lessons from my last effort. For one thing I learned that I didn't really set myself up for success to begin with. I basically walked in, put some flowers in a vase, set them on a table and went to it. How hard could it be? Wellll....

The first problem was that there is actually quite a lot that goes into setting up a nice still life. I figured since it had been a very long time I would keep it simple by focusing on just the flowers and a vase, and no other extraneous objects. Only extraneous objects were all around my prior "setup" (if you could call it that.) The utility sink was in the background, as well as pictures hanging on a wall, art supply bins nearby, etc.  It's not impossible to paint that stuff out, but it is pretty distracting.

Secondly, in my previous attempt, the lighting was completely flat and non directional. That's great for studio lighting in general, but it makes it harder to create form and good color without that definitive light and shadow. I felt like it was kind of akin to painting outside on a gray day.

So the first order of business was to remedy these issues, and create an environment where I would be "set up" for success.  Once I found a solution to my setup issues (which I will share in my next post) I felt like I had more control.

Here's how it went down, in various stages:

Initial design in a wash of cobalt blue, burnt sienna, and chromatic black:

Still life floral painting demo by Jennifer E Young

Blocking in; shadows first, then midtones:

Still life floral painting demo by Jennifer E Young

Fleshing it out:

Still life floral painting demo by Jennifer E Young

And the final:

"Tulips and Mandarins" Oil on Linen, 14x11" ©Jennifer E Young

"Tulips and Mandarins" Oil on Linen, 14x11" ©Jennifer E Young

New floral still life (WIP)

I wish I could say that I was as passionate a flower arranger as I am a gardener, but I'm afraid to watch me make the attempt, you'd likely think I was wrestling the blooms into submission rather than celebrating a creative act. Maybe one day I will learn, but at present, my arrangements are pretty tenuous, and they only  look ok as long as you don't look at the back! But I have these great blooms right now in my garden from my massive Limelight Hydrangea, and I have been really wanting to capture them in paint before they are done for the season.

limelight.jpg

The shrub itself is far larger than I imagined it would be for my space (probably topping out at 8 or 9 feet by now) , but then that is true of just about everything in my garden! The blooms start out a lovely creamy white, and then turn a gorgeous lime green tinged with pink by season's end. Then the other day while shopping I saw these sunflowers lined up like happy little children, so I grabbed a bunch to add to the mix, and an arrangement was born.

It's been a while since I have painted a floral, but I really feel it's so important to regularly practice working from life, and it's been raining an awful lot this last week. So, with fall lurking just around the corner and my flower garden in its final days, I finally felt inspired to give it a go. (Better late than never, I guess!) Here, below,  is the initial block-in on my 24x20" linen canvas.

Floral still life painting in progress by Jennifer E. Young

Floral still life painting in progress by Jennifer E. Young

This is about 3 hours' work. I try not to get too detailed yet, but I have my basic pattern down so that I can jump right in when I return to the easel.

Sunflowers!

I've needed some cheering up lately, so yesterday I started a new painting of Tuscan sunflowers. It's nearly impossible to frown while beholding a sea of sunflowers, right?

Tuscany sunflowers painting in progress by Jennifer E. Young

Feeling better already :-)

Top ten reasons to paint your back yard garden

  1. You can paint it better than it actually looks (a few more roses here, a few less weeds there...)
  2. Unlike a public garden, you likely won't get taken unawares by the sprinkler system.
  3. You are intimately familiar with how the light travels through the garden at different times of the day.
  4. You are intimately familiar with the location of the latrine (and more than likely it will be free and fairly clean.)
  5. You can leave all of your gear set up during breaks (and probably won't need to get someone to watch your stuff as you break for the above mentioned latrine.)
  6. You can do your part to reduce the carbon footprint (no need to drive anywhere.)
  7. Forgetting to pack an important supply is easily remedied.
  8. Plenty of opportunity to take weeding and pruning breaks (okay, this might not be such a good thing for your painting, but your garden will love it.)
  9. You won't look like a crazy lady wandering through the park staring at trees, with luggage, a big floppy hat, and a compass. (You'll just look like a crazy neighbor wandering around her yard with luggage, a big floppy hat, and a compass.)
  10. The reception to the wireless baby monitor extends just to the edge of your yard!
"Under the Limelight" Oil on board, 8x6" ©Jennifer Young

"Under the Limelight" Oil on board, 8x6" ©Jennifer Young

This little painting is kind of a cross between a still life and a plein air painting. The Japanese lantern sits at the corner of my garden under the limelight hydrangea (hence the title.) Since the hydrangea isn't yet in bloom, I've punched up the corner with some potted geraniums.