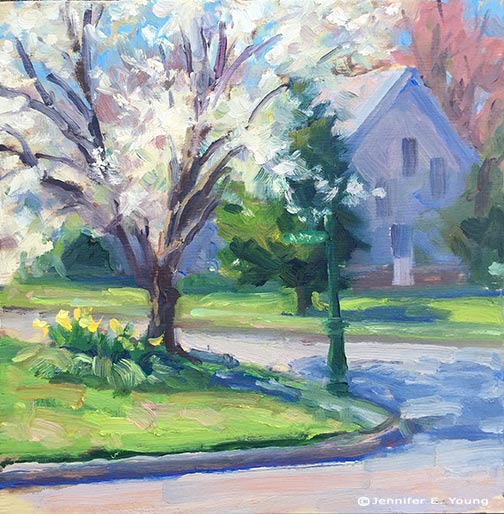
Commissions part II

This post is a continuation of a prior post I've written on my commission process. If you missed it you can find that post here. Having secured the final approval for the first commission I wrote about yesterday, I needed to do it again for the second painting.  During my image archives search for a complementary composition I came across this 20x16" painting, done some years ago from my own photo references and sketches done on site. I felt this composition was similar enough in feel to relate to the first painting, and yet different enough to add some visual interest:

"Little Shop on the Corner" (SOLD) ©Jennifer E Young

"Little Shop on the Corner" (SOLD) ©Jennifer E Young

Because I wanted the  two little commissioned paintings to "talk to each other", I reversed the above painting, and scaled the image to 16x12". Like the first painting, this one also scaled really nicely to the new format:

grayscaleprovencepainting_jenniferyoung

Using my photo-shopped mock-ups, I provided a this shot below to show how the two paintings would look side by side:

Vibrant paintings of French and Italian villages ©Jennifer E Young

Vibrant paintings of French and Italian villages ©Jennifer E Young

There were a few color notes to keep in mind. The client wanted these to pieces to go in a room with an open floor plan where other artwork was already present. There was one painting in particular, a large pastoral with a red barn, that I needed to be cognizant of when creating my pieces. I didn't need to "match" the red, but I needed to be aware of it so as not to clash. This painting had a mid-to-cool temperature red focal area, so I'd steer away from anything too orangey. There were also some lovely aubergine and turquoise accents  in the shadows of the large painting that I noted and would attempt to riff off of in the paintings I was about to create.

My collector gave a big thumbs up to the ideas I had proposed. Whew! Awesome! Now for the fun/hard part of creating them! In my next post I'll show you how everything came together in the final paintings, and provide some thoughts to keep in mind about commissions in general, which I think will be of interest to the collector and artist alike.

The making of a commission

It's hard to believe summer is almost over. The move of my home and business, along with family matters, tended to completely monopolize my spring and summer, and yet there is still so much to do.   While we are slowly settling into the house, it will be some time before I have a studio. So I have "made do" with either painting outside in the blazing summer heat, or setting up a temporary studio with drop cloths in my poorly lit living room. For those reasons, my painting production has been down and it's been driving me a little crazy. Nevertheless, opportunity waits for no one, and commissions are a special kind of opportunity. Time to pull out the drop cloths and shop lights again! :-)  I have been painting for 20 years, and in that time, I've had a variety of commissions. Some are more "challenging", and some are pure delight. Of course, the latter are more pleasurable, but all commissions have been, to me, opportunities for growth as an artist.

My latest commission, in spite of my less than ideal work environment,  fell distinctly in the realm of the delightful. I met the client during a painting demonstration at the Little Gallery where my work was being featured in June. He happened to love one of my paintings in that show, called "The Potted Garden, Pienza":

"The Potted Garden", Oil on canvas, 12x12" ©Jennifer E Young

"The Potted Garden", Oil on canvas, 12x12" ©Jennifer E Young

The only issue was that the format (square) wasn't quite right. He was looking for a slightly larger, more vertical painting, and a companion piece of the same size to complement it in an adjacent spot.

I loved this little scene and I was happy to explore it again with a different format. So my first task was to convert my square composition to a vertical piece. Luckily, the architectural subject matter leant itself to the task naturally, and I was able to use Photoshop to render a "sketch" for a proposal in much faster time than I would have been able to do free-hand:

italianvillagemockup_jenniferyoung

As you can see, I didn't labor over rendering the upper portion. The purpose was just to continue it upward to demonstrate how it would look. (Photoshop is a very expensive program, but nothing beats it for working out compositional options for paintings!)

In all honesty, because the location of the focal point was in the right position for both the original 12x12"  and the commissioned 16x12" format,  I didn't have to do much to the composition of the original painting beyond extending it. That's not always the case, believe me, but this time things worked out really well. But because I was losing a window on the upper left, I did suggest that I replace the two flower pots under the window for a larger, single hanging basket, as this would give this area more unity.

Once I received the client's approval for my proposal of the first painting, I set to work finding a second composition that I would create as a companion piece. I'll cover that in the next installment. Stay tuned!

First painting since the move!

After re-reading my post from yesterday I started to feel like a wimp, complaining about the heat and all. Then I tried it and realized that heat stroke does not improve your art one iota! All kidding aside, it was boiling lava hot outside on my patio. I only lasted about an hour before I decided I'd have to leave it until the next day, and pick up where I left off. And so I painted this piece over two sessions, noting the time of day and returning to wrap up at the same time this morning.

"A Taste of Summer" Water soluble oils on Linen, 12x12"  Jennifer E Young

"A Taste of Summer" Water soluble oils on Linen, 12x12"  Jennifer E Young

This little outdoor still-life setup includes the herbs and flowers I brought from my old place, as well as a big beautiful housewarming gift from our new neighbors (the pink and orange spray behind the basil). A  marriage of old and new,  I felt it was the perfect subject to kick off this new beginning.

I experimented with this painting using Cobra water-soluble oil paints by Royal Talens . I was inspired to try them when I started following the very talented painter Mark Hanson's discussions about them on Facebook and on his blog. I have friends who use water miscible oils, too, but having tried them before without success I haven't been compelled to try them again. But when Mark suggested that his migraine headaches may have gone away after switching to these oils, I took notice and decided to try this new (to me)  line of paints myself.

I have suffered from insomnia for years, and yet ever since we moved to the new house, I have only had two bad nights. That's pretty incredible! Coincidentally, with the exception of yesterday and today,  I have not painted since we've been here. Is it possible there is some other reason for my new-found improved sleep? Absolutely. But it's also possible the fumes were getting to me and I didn't even realize it. It has also bothered me for a while that I am eating as much organic and natural food as I can afford, I'm also inhaling volatile organic compounds on a daily basis in my work. And if we ultimately decide to set up my studio in our current attached garage, water soaked paper towels are going to be a lot safer than ones soaked with mineral spirits, odorless or not!

I first tried water-soluble oils several years ago. I believe they were Winsor & Newton's Artisan series. At the time I found the handling too gummy and tacky and not to my liking at all. I may not have given them a fair shake though, because in recent weeks I have read that you really should not thin your paints with water or it will produce that tacky, gummy effect and make the paints rather dull and cloudy looking. Instead, Mark advised not to rinse off your brushes too much with water, but to just wipe off the brushes as much as possible in between color mixture sinstead, and save the water for the final cleanup. If needed, use a water miscible oil painting medium created specifically for these paints rather than water to increase viscosity.

That advice made a world of difference and I found myself painting without fighting with my materials. There was a slight difference in the handling and a few old habits to overcome, but nothing so difficult as to put me off. I would say they did not flow as easily for me as my traditional oils, and the color intensity was a tad weaker, but not by a tremendous amount. On the other hand, they have absolutely no odor and seem like they would be great for travel.

From what I have read so far, the drying time may be a bit longer than what I'm used to. But that should not be an issue for ole' Pokey, here. I do hope they dry well and evenly, without any dull passages or great shifts in color or value. I will report back on this if I notice anything remarkable. I look forward to experimenting more with these paints. I really hope these will be my new go-to paints, and that I can ditch the OMS once and for all!

Delphiniums in the Rain

We are in the final push to put our current home on the market this week, so when I woke up this morning looking at the very gray sky and the mountain of work I had to do at home, I almost didn't go out to paint. Luckily my darling husband wouldn't hear of my excuses and practically kicked me out the door. ;-) I had been invited to paint with friends in this beautiful walled garden at a private turn-of-the-century residence tucked back in rolling hills near the banks of the James River. The drive up to the site was stunning in itself. Beautiful bucolic fields were lined with stately mature trees of all kinds. But it wasn't until I entered the garden past the roses and rounded a corner to take in this view that I audibly gasped. I remember my first thought when I saw this beautiful flower lined walkway was that I hoped I had brought the right blues.

"Delphiniums at Redesdale" Oil on panel, 12x9"  Jennifer E Young

"Delphiniums at Redesdale" Oil on panel, 12x9"  Jennifer E Young

I am told that this garden was designed by Charles Gillette, who is pretty famous around Virginia for his formal garden designs on stately homes such as Agecroft Hall, The Virginia House, and Tuckahoe Plantation. I believe he also had a hand in some of the early designs of the  Lewis Ginter Botanical Gardens.

The rain fell softly off and on during this painting. Every once in a while sunlight and a bit of blue sky peeped through, but luckily not enough to "ruin" my cloudy day painting. At several points things got pretty soggy, and I found myself jostling my brushes, paper towels, and my painting umbrella, which I was using as a rain umbrella for myself, my painting, and my palette. But it all worked out in the end, so I guess that's what matters!

Pear Squared!

Change is in the air. Nothing seems to change as fast in spring as the appearance of blooms on fruit trees. One minute they are ablaze with blooms, and the next they are leafing out. Here's a little ditty I did yesterday morning right from my own garden. Mine is largely a late spring/summer garden, but my neighbor shares a little early spring splendor from across the street:

"Pear, Squared" Oil on Panel, 8x8"  Jennifer E Young

"Pear, Squared" Oil on Panel, 8x8"  Jennifer E Young

It used to be really spectacular, almost cotton-ball like. Then a year or two ago a huge chunk either blew off in astorm or it got struck by lightening. The top was split in two and I was so sad because I had always meant to paint it at this time of year and something always seemed to pop up to prevent me from getting to it before it leafed out. Any way, thankfully, it survived. And in spite of yet another very windy morning, I managed to get it down.