A Venetian Companion

This week I am working out a companion piece to the little Venetian painting I posted the week prior. I often find that small paintings do well in pairs. Certainly a small piece can stand on its own, but it is often nice for the little guy to have someone to talk to. A pair can flank either side of a large mirror or mantle, or stack together on a tall narrow wall:

outerbankspaintings_jenniferyoung

I love grouping paintings, and while it doesn't work for every piece, I have started to try and think in terms of finding a  buddy for my little friends when it's possible. This is the start for our little Venetian companion:

venetiansepiasketch_jenniferyoung

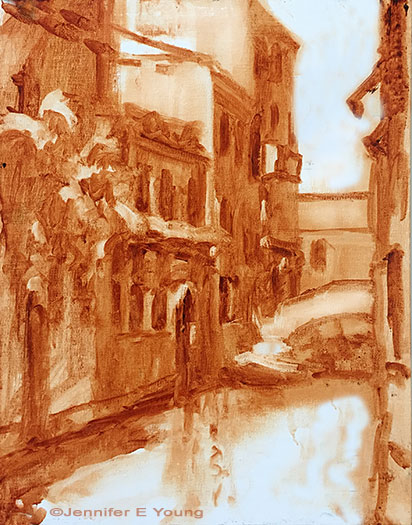
A rough lay-in in burnt sienna gives a first pass at my light and shadow family. When I start to add color, I will keep those two families in mind. First up is the shadow family:

venicepainting_wip_jenniferyoung

You can see that even some of the "white" colors (around the door frames, etc, are still in shadow and will therefore generally be a darker value than anything in the light family. The eye can really trick you once you bring color into the picture, so it is something to be aware of at all times! More to come! Stay tuned.... 

October Pumpkins

In Hanover County, Virginia,  where I now live, fall is particularly lovely. The profusion of green has given way to warm rich tones of gold, red and orange. October is pumpkin season, and you don't have to drive too far around here to find a roadside stand where you can pick up some  pumpkins to decorate the front stoop. If you are feeling adventurous you can even take the kids to a pumpkin patch so they can pick their very own.  Myself, I rather like leaving them put and painting them right where they are growing (in this case, the pumpkins, not the kids!). 

"October Pumpkins, Hanover" Oil on Panel, 8x10" ©Jennifer Young

"October Pumpkins, Hanover" Oil on Panel, 8x10" ©Jennifer Young

This painting came about after getting a call from a painter friend of mine. She'd made arrangements to paint at the Hanover Vegetable Farm on one of the last days in October, and invited me to come along. I drive past this farm from time to time and I'd been eyeing those pumpkins for a couple of weeks. But for whatever reason, I hadn't gotten around to calling the proprietor up about painting there. So when the chance arose, I jumped on it. We got there around 8 a.m. The sun was low and the moon was still up. And of course, there were all of those cute round pumpkins gathering round the dirt path and echoing the shape of the waning moon. 

While I have really loved painting with my water soluble oil paints in the studio lately, I painted this piece solvent free using traditional oils. I used a little bit of Gamblin's Solvent Free Gel for my medium, and cleaned my brushes with walnut oil. I'm happy to report that it worked out just fine. I am so glad to leave that messy can of toxic solvent  out of the picture and just pack a little bottle of walnut oil and a small jar to swish my brushes in for cleaning. 

It's been raining around here for the last couple of days and I am anxious to see if the foliage will hold up until the sun comes back out. It would be great to get out a few more times before we have to say farewell to all of this gorgeous autumn color. We will see....

La Barchetta Rossa

I had such fun with this little painting that I am thinking of doing it again as a larger piece. My goal in the execution was to keep it loose and not get bogged down in too many details that can happen so often when approaching architectural scenes; especially when working from photo references. 

"La Barchetta Rossa", Oil on linen, 12x9", ©Jennifer Young

"La Barchetta Rossa", Oil on linen, 12x9", ©Jennifer Young

As with plein air painting, sometimes giving yourself a handicap can be very helpful. Squinting, for instance, allows one to reduce visual information down to shapes, patterns, and values. These days taking off my glasses serves a similar purpose (*SIGH*). Another method that I experimented  with here was to "blur it up"  using one of the artistic filters in Photoshop. This has the effect of removing the detail while still providing the shapes and values. I used my blurry image for most of the painting, and then referenced the detailed photo at the end to see what I may have missed and add the finishing touches. What was interesting is that I liked the freshness of my initial round so much that I found very little I wanted to add or adjust once I referenced the detailed photo. I have often used Photoshop to adjust shadows and highlights in my photo references, or to crop for ideas on composition, but this was the first time I have used it to remove detail. I really liked this method and will likely do it again, especially for complicated scenes like architecture where it can really be helpful to turn down the visual "noise".

A new look and a new painting!

There were times this week when I really doubted that this announcement would come, but I finally have my new website up. Hurray! There were a few glitches along the way (and there still may be some kinks to work out yet) but overall I am pretty happy with the fresh new look.

Speaking of fresh and new, I'll also share a newly finished painting.

"Daytrippers, Lake Como, Cobra Oils on linen,  20x24" ©Jennifer E Young

"Daytrippers, Lake Como, Cobra Oils on linen,  20x24" ©Jennifer E Young

I actually blogged about the start of this piece a while ago but I got to a point where I just had to take it off of the easel for a while and let it marinate. Sometimes the best way to approach a problem is to do something completely different for a while , so that's exactly what I did. When I was ready to return I could look at it with new eyes (albeit bloodshot ones from staying up late trying to get my website up and running) and bring it to a satisfactory conclusion.

A new thing-a-majig and a new painting

In the wake of the plein air weekend I wrote of in my last post, last week was mostly a recovery week for me. I did manage to get a new studio painting started, however. This is the initial tonal sketch on a 20x24" linen canvas.

Tonal sketch

Tonal sketch

This painting  may prove to be a challenge for me because much of this scene is in shadow. But there are a few pops of light that I am arranging in strategic places that I hope will carry the painting. Hey, you never know unless you try, right?

As with the other recent studio oils, I'm working with water miscible paints. One thing I'm noticing with these paints is that the paint blobs on my palette tend to gum up a little quicker once they are laid out, especially when I can't get back to the studio within a day. The manufacturer, Royal Talens recommends in their product info to mist the unused paints with a little water and cover  with foil to keep them moist and reduce the exposure to air. I have never liked putting plastic or foil directly on my paints though, because I feel that it wastes too much in the removal (yes I realize there is a bit of faulty logic in there but we all have our pet peeves).  So I'm experimenting with this:

cakepan_lid.jpg

What you are seeing is a basic 9x13" cake pan covered with a silicone doo-jobby that I found on Amazon. It is supposed to create an airtight seal, and the cake pan is deep enough that this cover-thing doesn't actually touch the paint. Whether it will be sufficient to keep the paint from oxidizing remains to be seen. I haven't been back at the easel since Saturday so I guess I will find out this morning when I go to work. I will report back with my findings, as well as an update on my progress with the painting, in an upcoming post.